News
The Age of Enlightenment – Wood Engraving Experiance

Members of the Creative Perspectives Group* were recently given the opportunity to learn about the art of wood engraving.
Wood engraving requires a huge amount of concentration, visual, physical and mental. At times it was easy to become absorbed in the process, concentrating only on mark making, a type of breathing space from the everyday.


The Spitsticker
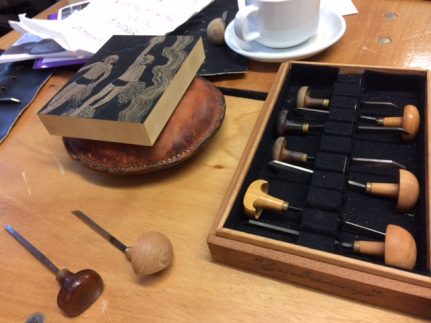
The first tool that was introduced was the spitsticker, which is used to create fine lines, small marks and outlines. Each of the participants were given a small piece of Engraver’s plastic which was rested on two paperback books (about 5-6inches deep) to give a comfortable working height and used the spitsticker tool to engrave a test piece. This was a fine sharp v shaped blade. We were shown the technique of moving the plastic block around the tool to create movement in the lines rather than keep the plastic block still.
The Scorper
Once we had practiced this technique we were introduced to the round scorper for clearing areas. This tool was much rounder than the spitsticker tool and created a wider mark, however was more liable to slippage and was therefore harder to control. It can also be used to create perfect circles, by turning the plastic block around the tool.
The Final Piece
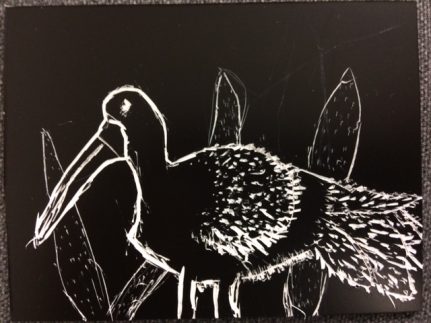
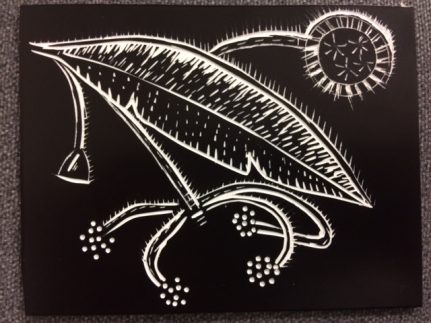
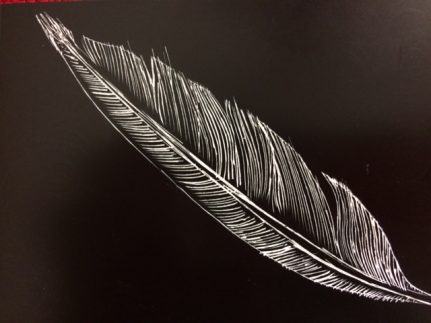
Finally we were given a smaller piece of Engraver’s plastic to create a finishing image to use all the various mark making techniques that we had learnt throughout the morning. Some of the group preferred more of the fine marks of the spitsticker tool whilst others had a more graphic representation favouring the round scorper.
Some of the group used wood engraved images for inspiration including those by the artist Angie Lewin. Leonie offered us white pencils for marking out our designs. White carbon copy paper can be used for transferring more intricate designs on to the wood block. Towards the end of the day all that remained was to produce a final print. The ink was spread on a glass sheet, rollered smooth and then applied to the engraved image.
Next the paper was laid over the engraved lines and pressure applied with the back of a teaspoon. Leonie’s pieces are so intricately carved that a true impression will only appear using a press.
Peeling back the paper the print was revealed, showing the reverse image of the engraving. It was exciting to see the range of images that resulted from the day’s course.
Thoughts at the End of the Day……..
I really enjoyed the Wood Engraving Day training. We had an excellent trainer who taught us some of the Basics of wood Engraving. I enjoyed seeing all the wonderful designs made by my fellow artists. I now have my Engraving of a stork hanging up in my sitting room, Very satisfying.
Wood Engraving Skill
Attending the workshop has offered an insight into the level of skill required to produce the exquisite images of professionals such as Hilary Paynter and Leonie Bradley. It has also highlighted how the technique can be used both in a traditional manner and using a more contemporary style such as Leonie’s distinctive use of a multi-line tool producing a soft background as in her image ‘Feeling Invisible’ or in her sparse use of line as in ‘Connected Loneliness.’
Wood engraving is a relief printing technique, along with lino printing, where all the light areas of the image are cut away leaving the raised areas to be inked and printed, as opposed to the intaglio method where the engraved lines are filled with ink. Leonie described the method in which light and shade as depicted in photography as being a useful tool in being able to understand the positive and negative areas of the engraved image of the woodblock.
Wood engraving requires a huge amount of concentration, visual, physical and mental. At times it was easy to become absorbed in the process, concentrating only on mark making, a type of breathing space from the everyday. After a few hours it was important to take a break rest the eyes, the hands and the brain and return to the artwork with fresh eyes.
There are times when just like the engraving tool and the woodblock it feels as though the world is spinning, moving , progressing when we are standing still. If an artist such as Hilary Paynter can restore the society of wood engravers, revitalise the art of wood engraving and produce a fine body of work in her 7th decade then it is vital for us all to find our passion and pursue it for as long as possible. That is essential for ageing well!
A Craft for the 21st Century
Today has indicated that with artists such as Leonie Bradley through her modification of traditional techniques, wood engraving can develop into the 21st century with exciting new possibilities.
More Thoughts at the End of the Day……..
I had a brilliant day it was totally absorbing and Leonie made it look so simple and effortless that it felt within my means to have a go. I really enjoyed learning some new skills and was pleased with the results of my work.
I really enjoyed learning a new skill. I could feel my shoulders relax, my breathing deepen and my mind calm as I became totally absorbed in designing and creating throughout the day.
Thank you to Liz from Creative Perspectives for writing this insightful article for us and sharing their experiance of wood engraving.